Blockchain and Web3 development can seem intimidating at first, but the Flow network and its smart contract language Cadence make it surprisingly accessible. This guide walks through building a complete blockchain application from scratch, all the way to a working "Hello World" example with a React frontend.
What is Flow?
Flow is a network designed for the next generation of apps, games, and digital assets. It offers fast finality, low fees, and a developer-friendly environment. Flow was built with Cadence, its resource-oriented smart contract programming language, and recently added EVM compatibility for Solidity developers.
Cadence is designed for safety and simplicity, with built-in support for digital assets and composable contracts.
This tutorial focuses on Cadence, but you can also explore EVM on Flow if you prefer Solidity.

Prerequisites
In order to begin, make sure to have:
- Node.js (version 18 or higher)
- Git
- A code editor (VS Code recommended)
For detailed setup, see the Flow Getting Started Guide.
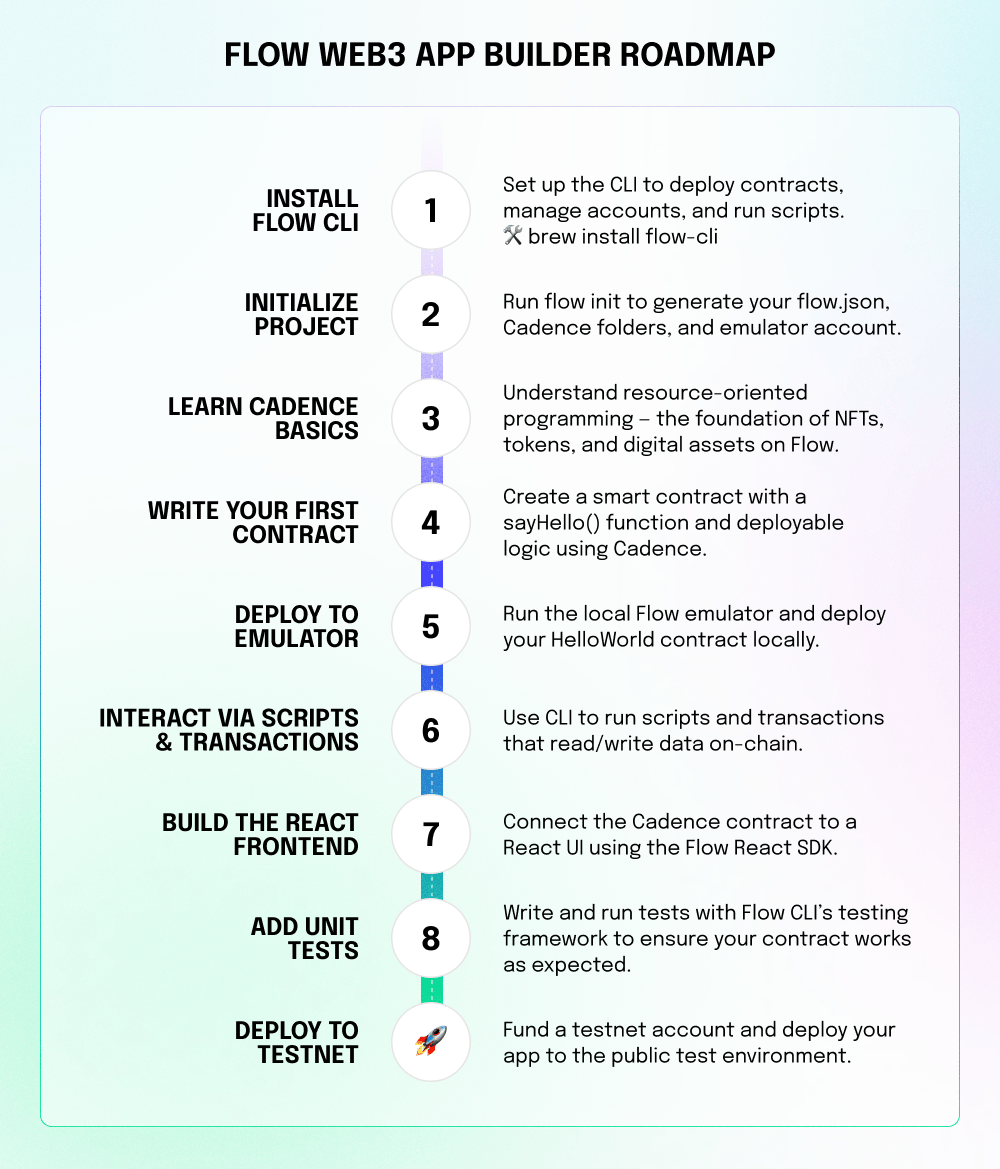
Step 1: Install the Flow CLI
The Flow CLI is the gateway to interacting with Flow: deploying contracts, running scripts, managing accounts, and more.
Installation
macOS
brew install flow-cli
Linux
sh -ci "$(curl -fsSL https://storage.googleapis.com/flow-cli/install.sh)"
Windows (PowerShell)
iex "& { $(irm https://storage.googleapis.com/flow-cli/install.ps1) }"
Verify installation:
flow version
You can explore all commands with:
flow help
Step 2: Create a Project
flow init
Enter the name of your project (i.e. your-project-name) Then choose "Basic Cadence project" from the interactive prompt.This creates a project folder:
- cadence/ - Contracts, scripts, transactions, and tests
- flow.json - Project configuration (accounts, deployments, contracts)
- emulator-account.pkey - Private key for a default account
cd your-project-name
Step 3: Cadence Basics
Cadence is built on resources, objects that can only exist in one place at a time and cannot be duplicated or lost. Perfect for assets like fungible tokens and NFTs.
Every Flow account has private storage for contracts, resources, and data. Digital property, such as collectibles and tokens are kept in this storage. Access is managed with fine-grained controls and capabilities.
Learn more in the Cadence Getting Started tutorial.
Step 4: Write a Smart Contract
Create cadence/contracts/HelloWorld.cdc with the CLI:
flow generate contract HelloWorld
Then, implement the contract:
access(all) contract HelloWorld {

   access(all) var greeting: String

   access(all) event HelloEvent(message: String)

   init() {
       self.greeting = "Hello, World!"
   }

   access(all) fun sayHello(): String {
       return self.greeting
   }

   // Warning: Anyone can call this function to change the greeting
   // See https://cadence-lang.org/docs/language/access-control
   // to learn about the granular access control available in Cadence

   access(all) fun changeGreeting(newGreeting: String) {
       self.greeting = newGreeting
       emit HelloEvent(message: newGreeting)
   }

}
This contract includes:
- A public variable greeting
- An event HelloEvent
- A function sayHello()
- A function changeGreeting()
⚠️ Warning: This contract allows anyone to change the greeting. For production apps, see Access Control.
Step 5: Deploy the Contract
Start the local emulator:
flow emulator start
In a new terminal, add the contract to be deployed:
flow config add deployment
Select emulator as the network for deployment.
Choose emulator-account as the account to deploy to.
Then pick HelloWorld as the contract you wish to create a deployment for.
Finally, deploy:
flow project deploy
You’ll see something similar to:
Deploying 1 contracts for accounts: emulator-account
HelloWorld -> 0xf8d6e0586b0a20c7 (e167b88c81f83d6c88fe5e4055ea138ba79a8fbdb4248c174c27e2bd745c7450)
🎉 All contracts deployed successfully
Step 6: Interact with the Contract
Script
Create cadence/scripts/GetGreeting.cdc with the CLI:
flow generate script GetGreeting
Then implement the script:
import "HelloWorld"

access(all) fun main(): String {
   return HelloWorld.sayHello()
}
Run:
flow scripts execute cadence/scripts/GetGreeting.cdcTransaction
Create cadence/transactions/UpdateHello.cdc with the CLI:
flow generate transaction UpdateHello
Then implement the transaction:
import "HelloWorld"

transaction {
   execute {
       let message = HelloWorld.sayHello()
       log(message)
   }
}
Run:
flow transactions send cadence/transactions/UpdateHello.cdc
Re-run the script to see the new message:
flow scripts execute cadence/scripts/GetGreeting.cdc
Step 7: Add a React Frontend
Below, explore a sketch of a UI built with the Flow React SDK. The SDK is compatible with Next.js, Vite, and other popular frameworks.
See the frontend quickstart for more details.
src/app/page.tsx
'use client'

import { useState } from 'react'

import {
 FlowProvider,
 useFlowCurrentUser,
 useFlowQuery,
 useFlowMutate,
} from '@onflow/react-sdk'

import flowJson from '../flow.json'

function HelloWorldApp() {
 const [newGreeting, setNewGreeting] = useState('')
 const { user, authenticate, unauthenticate } = useFlowCurrentUser()
 const { data: greeting, isLoading, error, refetch } = useFlowQuery({

   cadence: `
     import "HelloWorld"
     access(all) fun main(): String {
       return HelloWorld.sayHello()
     }
   `,

   query: { enabled: true },

 })

 const { mutate: changeGreeting, isPending, error: txError } = useFlowMutate({
   mutation: { onSuccess: () => { setNewGreeting(''); refetch() } },

 })

 return (
   <div style={{ padding: 20 }}>
     <h1>Hello World dApp</h1>
     <p>{isLoading ? 'Loading…' : error ? error.message : greeting}</p>
     {user?.loggedIn ? (
       <>
         <input
           value={newGreeting}
           onChange={(e) => setNewGreeting(e.target.value)}
           placeholder="New greeting"
         />
         <button onClick={() =>
           changeGreeting({
             cadence: `
               import "HelloWorld"
               transaction(newGreeting: String) {
                 prepare(acct: &Account) {}
                 execute { HelloWorld.changeGreeting(newGreeting: newGreeting) }
               }
             `,
             args: (arg, t) => [arg(newGreeting, t.String)],
           })
         } disabled={isPending || !newGreeting.trim()}>
           {isPending ? 'Changing…' : 'Change'}
         </button>
         <button onClick={unauthenticate}>Disconnect</button>
       </>
     ) : (
       <button onClick={authenticate}>Connect Wallet</button>
     )}
     {txError && <p style={{ color: 'crimson' }}>{txError.message}</p>}
   </div>
 )
}

export default function App() {
 return (
   <FlowProvider
     config={{
       accessNodeUrl: 'http://localhost:8888',
       flowNetwork: 'emulator',
       discoveryWallet: 'https://fcl-discovery.onflow.org/emulator/authn',
     }}
     flowJson={flowJson}
   >
     <HelloWorldApp />

   </FlowProvider>
 )
}
Step 8: Testing
Flow CLI includes a built-in test runner.
Open the autogenerated file cadence/tests/hello_world_test.cdc and update it to import the contract and test the hello message:
import Test

import "HelloWorld"

access(all) let account = Test.createAccount()

access(all) fun testContract() {
   let err = Test.deployContract(
       name: "HelloWorld",
       path: "../contracts/HelloWorld.cdc",
       arguments: [],
   )

   Test.expect(err, Test.beNil())

   Test.expect(HelloWorld.sayHello(), Test.equal("Hello, World!"))

}
Run:
flow test
See Flow Testing Docs for details.
Step 9: Deploy to Testnet
When ready to move beyond the emulator, start by creating a new account for testnet:
flow accounts create
Fund the account from the faucet:
flow accounts fund <address>
Then add a deployment:
flow config add deployment
Finally, deploy:
# Deploy contract to testnet
flow deploy --network testnet
⚠️ Ensure your flow.json is configured with a testnet account and keys.
Next Steps
For more complex applications, the following will be needed:
- Resources — unique, non-copyable objects (e.g., NFTs)
- Capabilities — controlled access to resources/functions
To learn this and more, see:
Conclusion
By following this guide, a Web3 developer can go from setting up the Flow CLI to writing, deploying, and interacting with their first Cadence smart contract, and even connecting it to a React frontend. Along the way, they’ve seen how Flow’s developer tools, emulator, and testing framework simplify the process of building real blockchain applications.
What’s been built here is just the starting point. With Cadence’s resource-oriented model, a builder can create secure, composable digital assets. Whether they’re experimenting locally or deploying to testnet, Flow provides a smooth path from idea to production-ready app.
Keep exploring the resources linked above, and consider extending the project with capabilities, NFTs, or DeFi logic. The Flow community is active and welcoming, so don’t hesitate to join developer office hours or contribute to open-source projects.
Resources


